Problem Set 2
Due before the start of lecture on October 15, 2024. See below for a summary of the policies regarding late submissions.
- Preliminaries
- Part I
- Part II
- Overview
- Getting started
- Code-reading and design questions
- General notes
- Problem 3: Marshalling column values
- Testing your marshall() method
- Problem 4: Completing INSERT commands
- Problem 5: Table iterators and unmarshalling
- Problem 6: SELECT * for a single table
- Sample interaction
- Submitting your work for Part II
Preliminaries
Homework is due prior to the start of lecture. If it is submitted more than 10 minutes after the start of lecture, it will be considered late. There will be a 10% deduction for submissions made any time in the following seven days, up to the start of the next lecture. We will not accept any homework that is more than 7 days late. Plan your time carefully, and don’t wait until the last minute to begin an assignment. Starting early will give you ample time to ask questions and obtain assistance.
In your work on this assignment, make sure to abide by our policies on academic conduct.
If you have questions while working on this assignment, please attend office hours or post them on Ed Discussion.
Part I
40-50 points total
Creating the necessary file
This part of the assignment will all be completed in a single PDF file. To create it, you should do the following:
-
Access the template that we have created by clicking on this link and signing into your Google account as needed.
-
When asked, click on the Make a copy button, which will save a copy of the template file to your Google Drive.
-
Select File->Rename, and change the name of the file to
ps2_partI. -
Add your work for all of the problems from Part I to this file.
-
Once you have completed Part I, choose File->Download->PDF document, and save the PDF file on your machine. The resulting PDF file (
ps2_partI.pdf) is the one that you will submit. See the submission guidelines at the end of Part I.
Problem 1: Fixed-length and variable-length records
19-29 points total
Recall the Oscar table from our movie database in
Problem Set 1. Assume that we are using a simplified
version of that table with the following schema:
Oscar(movie_id CHAR(7), person_id CHAR(7), type VARCHAR(23), year INTEGER)
Consider the following tuple from that table:
('9115530', '1567113', 'BEST-ACTRESS', 2022)
which captures the fact that Jessica Chastain (whose id is
'1567113') won the 2022 Oscar for Best Actress for her performance
in The Eyes of Tammy Faye (which has an id of '9115530').
-
(3 points) What would this tuple look like if we stored it in a fixed-length record? In the 1.1 and 1.2 section of
ps2_partI(see above), put your answer in the table labeled record contents.You should observe the following conventions:
-
Give each data value its own cell of the table. Adjust the widths of the cells as needed to better fit the sizes of the values, and delete any cells that are not needed.
-
Use a number sign (
'#') as a delimiter when it is necessary to record the end of a variable-length field’s value. -
Use hyphens (
'-') for any “wasted” bytes (i.e, bytes that are part of the record’s representation but are not actually storing useful data or metadata).
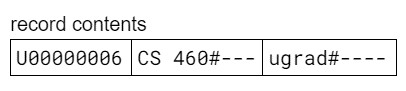
To illustrate these conventions, imagine that we were working with the
Enrolledtable in our university database, which has the following schema:Enrolled(student_id CHAR(9), course_name VARCHAR(10), credit_status VARCHAR(10));
If we wanted to show what the tuple
('U00000006', 'CS 460', 'ugrad')would look like using a fixed-length record, we would fill in the table as follows:
-
-
(2 points) What is the length in bytes of the record from part 1? Assume that we are using:
-
two-byte integers
-
one-byte characters – including any digit characters that are part of a
CHARorVARCHAR.
Put your final answer in the box labeled length in bytes, and show your work in the box below the answer.
-
-
(3 points) What would this tuple look like if we stored it in a variable-length record in which each field is preceded by its length?
In the 1.3 and 1.4 section of
ps2_partI, put your answer in the table labeled record contents.In addition to the conventions that we specified for part 1, you should also give each metadata value its own cell of the table. Change the background color of cells containing metadata to distinguish them from cells containing actual data values. You can do so by using the icon that looks like a paint can in the menu bar at the top of Google Docs.
In addition to the assumptions about the sizes of characters and integers that we gave you in part 2, you should assume that integers used for metadata are also two bytes long.
-
(2 points) What is the length in bytes of the record from part 3? Make the same assumptions stated in parts 2 and 3. Put your final answer in the box labeled length in bytes, and show your work in the box below the answer.
-
(4 points) What would this tuple look like if we stored it in a variable-length record that begins with a header of offsets?
In the 1.5 and 1.6 section of
ps2_partI, put your answer in the table labeled record contents. Use the same conventions that we specified for parts 1 and 3, and use the same assumptions about the sizes of characters and integers that we gave you in parts 2 and 3. -
(2 points) What is the length in bytes of the record from part 5? Put your final answer in the box labeled length in bytes, and show your work in the box below the answer.
-
(3 points) Now consider the following
Oscartuple:('1036646', NULL, 'BEST-PICTURE', 2022)which captures the fact that Coda (which has an
idof'1036646') won the 2022 Oscar for Best Picture.What would this tuple look like if we stored it in a variable-length record that begins with a header of offsets?
In the 1.7 section of
ps2_partI, put your answer in the table labeled record contents. You should use:-
the approach to
NULLvalues that we took in lecture -
the same conventions that we specified for parts 1 and 3
-
the same assumptions about the sizes of characters and integers that we gave you in parts 2 and 3.
There is no separate length-computation question for this record.
-
-
(5 points) Grad-credit problem (required of grad-credit students; may be completed by other students for “partial” extra credit) For each of the three record formats for the
Oscartable discussed above, provide a detailed step-by-step procedure for how thetypevalue of a given Oscar would be extracted from that Oscar’s record. Make sure to include specifics about how pieces of metadata (per-collection/table, per-record, or both) would be used to determine both the beginning of thetypefield in a particular record and the length of thetypevalue in that record. You may assume that none of the field values arenull. -
(5 points) Grad-credit problem (required of grad-credit students; may be completed by other students for “partial” extra credit) Briefly discuss the pluses and minuses of using each of these three record formats for the
Oscartable.
Problem 2: Index structures
21 points total; 7 points each part
Let’s say that you want to insert items with the following sequence of keys into a collection of records that uses some form of indexing:
31, 30, 29, 21, 19, 18, 13, 11, 8, 6, 5, 3, 2
-
Insert this key sequence into an initially empty B-tree of order 2. In section 2.1 of
ps2_partI, show the tree after each insertion that causes a split of one or more nodes, and the final tree. We have given you a sample diagram that includes nodes of different sizes. Make copies of the diagram so that you can use separate diagrams for the results of each insertion that causes a split, and for the final tree. Note that you do not need to keep the shape of the tree that we have given you. Rather, you should edit it as needed: deleting or adding nodes and edges, replacing the Xs with keys, adding or removing keys, and making whatever other changes are needed. -
Insert this same key sequence into an initially empty B+tree (note the +) of order 2. In section 2.2 of
ps2_partI, show the tree after each insertion that causes a split of one or more nodes, and the final tree. Here again, you should make copies of the diagram that we have given you and edit them as needed. -
Insert this same key sequence into a hash table that uses linear hashing. The table should use the hash function h(x) = x, and it should start out with two empty buckets. Assume that a bucket is added whenever the number of items in the table exceeds three times the number of buckets. In section 2.3 of
ps2_partI, use the tables that we have provided to show the state of the table before and after each increase in the number of buckets, as well as the final state of the table.
Submitting your work for Part I
Login to Gradescope by clicking the link in the left-hand navigation bar. Once you are in logged in, click on the box for CSCI E-66.
Submit your ps2_partI.pdf file using these steps:
-
If you still need to create the PDF file, open your file on Google Drive, choose File->Download->PDF document, and save the PDF file on your machine.
-
Click on PS 2: Part I in the list of assignments on Gradescope. You should see a pop-up window labeled Submit Assignment. (If you don’t see it, click the Submit or Resubmit button at the bottom of the page.)
-
Choose the Submit PDF option, and then click the Select PDF button and find the
ps1_partI.pdfthat you created in step 1. Then click the Upload PDF button. -
You should see an outline of the problems along with thumbnails of the pages from your uploaded PDF. For each problem in the outline:
- Click the title of the problem.
- Click the page(s) on which your work for that problem can be found.
As you do so, click on the magnifying glass icon for each page and doublecheck that the pages that you see contain the work that you want us to grade.
-
Once you have assigned pages to all of the problems in the question outline, click the Submit button in the lower-right corner of the window.
-
You should see a box saying that your submission was successful. Click the
(x)button to close that box. -
You can use the Resubmit button at the bottom of the page to resubmit your work as many times as needed before the final deadline.
Important
-
It is your responsibility to ensure that the correct version of a file is on Gradescope before the final deadline. We will not accept any file after the submission window for a given assignment has closed, so please check your submission carefully using the steps outlined above.
-
If you are unable to access Gradescope and there is enough time to do so, wait an hour or two and then try again. If you are unable to submit and it is close to the deadline, email your homework before the deadline to
esaracin@bu.edu
Part II
60 points total
Overview
In this assignment, you will implement portions of a simple relational database management system that supports a subset of the SQL language. We have provided you with two of the three components of the system:
- a SQL parser
- Berkeley DB, an embedded database system that will serve as the storage engine. More specifically, we will use Berkeley DB Java Edition.
Your job is to implement parts of the “middle layer” of the system, which takes the parsed version of a SQL command and performs the necessary lower-level actions to execute the command. To help you, we have given you a code framework for the middle layer that already provides some of the necessary functionality.
Getting started
You should begin by downloading the necessary files and configuring your work environment. The steps for doing so can be found here.
Please do this ASAP, so that you can be sure that you don’t run into any problems later on.
After configuring everything, you should spend some time
familiarizing yourself with the files that we have given you in the
dbms folder, and with Berkeley DB. In particular, you should
review/read the following resources:
- the overview of the code framework
- the API documentation of the code framework
- the lecture notes on implementing a logical-to-physical mapping
The following additional resources may also be helpful:
Code-reading and design questions
Before you begin coding, we highly recommend that you answer the questions found here, which will help you to prepare for your work on the problems from this part of the assignment.
General notes
-
As discussed on the separate configuration page, you will need to compile and run the code from the command line in the Terminal window of VS Code.
-
to compile:
javac -cp 'lib/*' -d classes *.java
(see below for the expected warning messages)
-
to run on Windows:
java -cp 'lib/*;classes' DBMS
-
to run on macOS:
java -cp 'lib/*:classes' DBMS
Note: The two commands for running the program are almost identical, but in the Windows version there is a semi-colon (
;) before the wordclasses, whereas the macOS version uses a colon (:). -
-
You will see one or more warnings when compiling your code (e.g., “Note: Parser.java uses unchecked or unsafe operations.”). These warnings are to be expected and should be ignored. Messages labeled as errors (not warnings) will keep your code from compiling and will need to be addressed. You shouldn’t see any errors when you compile the starter code that we’ve given you. If you do, let us know.
-
After making changes to the code, you will need to recompile it before you can try to re-run it. When you are at the command line of the Terminal, using the up arrow will allow you to access and reenter previously entered commands without needing to re-type them!
-
The code that we’ve given you can be run before you make any changes. It will begin by printing the following prompt:
Enter command (q to quit):
If you enter a valid SQL command, the program will parse the command and display a summary of some of the command’s components (see the notes on the DEBUG constant below for how to disable this summary). Entering a lower-case
qwill allow you to quit the program. -
When you run the program for the first time, it will create a directory called
dbwithin your code directory. This is the home directory for the Berkeley DB environment, and it will be used to store the files that BDB creates for your database. If your program crashes for any reason, these files may be corrupted. As a result, we recommend that you remove all files from this directory after a crash. -
There is a constant named
DEBUGthat is defined inDBMS.java. When it is set totrue(as it is in the files that we have given you), the values of many of the tokens generated by the parser are printed after each SQL command is entered by the user. You may find this information helpful as you implement the various types of commands. You may also wish to add additional debugging code that is only executed when this constant is set totrue. To eliminate the debugging messages, setDEBUGtofalse.
Problem 3: Marshalling column values
20 points
Important
Before you begin coding, make sure that you have completed the tasks listed under the Getting Started section above, and that you have answered the code-reading and design questions mentioned above.
In order to insert rows into a table, your DBMS needs to be able to
marshall a collection of column values into a single Berkeley DB
key/value pair. In this problem, you will add support for marshalling
by implementing the key method of the InsertRow class.
As you saw when completing the code-reading
questions, an InsertRow object is used by
the execute() method for INSERT commands (the one in the
InsertStatement class). That execute() method creates an
InsertRow object to represent the row to be inserted, and it calls
that object’s marshall() method to prepare the marshalled
key/value pair for the row.
We have already implemented some of the other methods of this class for you:
- an
InsertRowconstructor that initializes the state of object. It takes two parameters: an already openedTableobject for the table to which the row will be added, and an array of typeObjectcontaining the values in the row to be inserted. We assume that the values are in the appropriate order – i.e., that element 0 of the array contains a value for the first column in the table, element 1 contains a value for for the second column in the table, etc. We also assume that the values are valid and that they have been adjusted as needed to correspond to the types of the columns. - a
getKeyBuffer()method that returns aRowOutputobject for the key portion of the marshalled key/value pair. - a
getValueBuffer()method that returns aRowOutputobject for the value portion of the marshalled key/value pair. - a
toString()method that returns aStringrepresentation that includes:- the current contents of the
offsetsfield, which we recommend that you use when determining the offset values that will appear at the start of the marshalled value - the current contents of the key buffer (i.e., the array of
bytes that is inside the
RowOutputfor the key) - the current contents of the value buffer (i.e., the array of
bytes that is inside the
RowOutputfor the value). ThistoString()method should help you when debugging your marshalling code.
- the current contents of the
You will implement the marshall() method, which should take the
column values of the InsertRow object and marshall them into byte arrays
for the key/value pair that will eventually be inserted into the
B+tree for the table.
Important: marshall() should not interact with Berkeley DB at
all. In particular, it should not create any DatabaseEntry
objects or attempt to add them to the BDB database.
Rather, marshall() should only do the following:
-
Determine the correct offset values and store them in the array to which the
offsetsfield in theInsertRowobject refers. -
Write the appropriate values into the buffers represented by the
keyBufferandvalueBufferfields, each of which refers to aRowOutputobject.
See below for more detail about each of these tasks.
Notes:
-
Each key/value pair should have the format that we discussed in the lecture notes on the logical-to-physical mapping. The key portion of the key/value pair should be based on the value of the primary-key column. The value portion should consist of a header of offsets followed by the values of the non-primary-key, non-null columns.
-
The key portion of the key/value pair will be stored in the
RowOutputobject assigned to thekeyBufferfield of theInsertRowobject. The value portion will be stored in theRowOutputobject assigned to thevalueBufferfield. -
Because
RowOutputobjects fill their associated byte arrays from left to right, you will need to determine all of the offsets that belong in the header before you begin marshalling the column values themselves. Store these offsets in the array to which theInsertRowobject’soffsetsfield refers. -
Once all of the offsets have been computed and stored in the
offsetsarray, you can begin the process of writing into theRowOutputobjects using the appropriate methods. -
The
InsertRowconstructor takes a reference to the correspondingTableobject as a parameter, and it stores that reference in a field calledtable. Your code can obtain any column information that it needs from theTableobject and its associatedColumnobjects. -
The
getLength()method in aColumnobject gives the actual length in bytes of all columns exceptVARCHARs. In the case ofVARCHARs, you should determine the length by invoking theString.length()method on the actual value. -
Because the column values are stored in an array of type
Object, you will need to use type casts in order to treat them as objects of their actual types. For example, to treatvalues[i]as aString, you would need to do something like(String)values[i]. Consult theColumnclass for the method you should use to determine the type of a given column. -
Integer values are stored in the
valuesarray as objects of Java’sIntegerclass, and real values are stored as objects of Java’sDoubleclass. -
The
RowOutputmethods that you will use for writing the offsets and column values are inherited from theDataOutputStreamclass, so you should make sure to review the API of that class. -
When marshalling a
Stringvalue, you should use thewriteBytes()method, not thewriteUTF()method. -
You should assume that all offset values are small enough to be represented by a two-byte integer, and thus you should use the
writeShort()method for them. -
To keep the
marshall()method from getting too large, you may want to add one or more private helper methods that can be called to do part of the overall task. -
Review the
Table,Column,RowOutput, andDataOutputStreamclasses as needed.
Testing your marshall() method
You should test your marshall() method thoroughly before proceding to
the next problem.
We’ve given you the following tools for doing so:
-
The
RowOutputclass includes atoString()method that shows the current contents of the underlying byte array. -
The
InsertRowclass includes its owntoString()method that shows the current values in theInsertRowobject’soffsetsarray and the contents of the byte arrays underlying theRowOutputobjects assigned to itskeyBufferandvalueBufferfields. -
The starter code that we’ve given you in the
execute()method ofInsertStatementwill create the necessaryInsertRowobject, call yourmarshall()method, and – if theDEBUGconstant in theDBMSclass istrue– print theInsertRowobject so that you can examine the values of its fields. (Note that the row won’t actually be inserted until you complete theexecute()method as part of Problem 4, but the existing code is sufficient for testing themarshall()method.)
Given these tools, you can:
-
Compile and run the
DBMSprogram as described above. -
Create a table using a
CREATE TABLEcommand. The starter code already includes everything needed to carry out this type of command. -
Enter one or more
INSERTcommands for the newly created table, and see if the output from printing theInsertRowobject looks correct.
For example, let’s say that you enter these two SQL commands:
CREATE TABLE Movie(id CHAR(7) PRIMARY KEY, name VARCHAR(64), runtime INT);
INSERT INTO Movie VALUES ('2294629', 'Frozen', 102);
If your marshall() command is working correctly, you should see the
following as part of the output of the debugging print statement:
-
for the
offsetsfield:[-2, 8, 14, 18]Because there are three columns, there are four offsets. The
-2indicates that the first column (id) is the primary key. The next two offsets (8and14) are the offets of thenameandruntimecolumn values, and the18is the offset of the end of the record. -
for the key buffer (i.e., the
keyBufferfield):[50, 50, 57, 52, 54, 50, 57]The numbers in this byte array represent the ASCII codes for the characters in the
idvalue'2294629':50for the character'2',57for the character'9', etc. -
for the value buffer (i.e., the
valueBufferfield):[-1, -2, 0, 8, 0, 14, 0, 18, 70, 114, 111, 122, 101, 110, 0, 0, 0, 102]This byte array begins with 8 bytes for the offset table:
-
The first two bytes (
[-1, -2]) represent the special-2offset for the primary-key column. When-2is represented using a two-byte integer, the individual bytes end up being the 8-bit representations of-1and-2.In general, when you use multiple bytes to store a negative number whose absolute value is relatively small, the rightmost byte will show the negative number itself, and all of the remaining bytes will show
-1. For example, if we stored-3using two bytes, we would see[-1, -3]as its two bytes. If we stored-10using four bytes, we would see[-1, -1, -1, -10]. -
The next two bytes (
[0, 8]) represent the offset of thenamecolumn, which has an offset of 8 bytes because it comes immediately after the offset table, which has a length of 4*2 = 8 bytes. -
The next two bytes (
[0, 14]) represent the offset of theruntimecolumn, which has an offset of 8 + 6 = 14 bytes in this particular row. -
The next two bytes (
[0, 18]) represent the offset of the end of the record, which is 14 + 4 = 18 in this particular row. -
The next 6 bytes represent the ASCII codes for
'Frozen':70for'F',114for'r', etc. -
The final 4 bytes (
[0, 0, 0, 102]) represent the 4-byte integer stored for the runtime value of102.
-
Note: When you store larger integers, the resulting bytes can be harder to interpret. Here are some examples:
-
If you stored a runtime of 150 in the
Movietable that we created above, you would see the bytes[0, 0, 0, -106]for the runtime. This stems from the fact that when only one byte is used to store a signed integer (one that could be negative), it can store any value between -128 and 127. When we store 150 using two or more bytes, the 8 bits in the rightmost byte look like they represent a negative number, because 150 can’t actually be represented using an 8-bit signed integer. -
If you stored a runtime of 300, you would see the bytes
[0, 0, 1, 44]for the runtime. That’s because we need more than 8 bits to store 300 as a binary number. In fact, when we convert 300 to binary, we get a 9-bit number: 100101100. When these 9 bits are stored as part of a 32-bit integer, we get:00000000 00000000 00000001 00101100
The bits in the rightmost byte represent the integer 44, and the bits in the byte to its left represent the integer 1.
Try inserting other rows as well, and convince yourself that your
marshall() method is working in all cases. For example, does it
work correctly when one of the column values is NULL?
Problem 4: Completing INSERT commands
10 points
We have given you the start of the execute() method of the
InsertStatement class, which is used to carry out INSERT commands.
As mentioned earlier, our provided code uses an InsertRow object
to prepare the row for insertion – marshalling it into a
key/value pair. You will need to complete the execute() method
by writing code that:
-
uses the byte arrays from the
RowOutputobjects in theInsertRowobject to construct the necessary Berkeley DB objects for the key/value pair -
adds the key/value pair to the underlying BDB database.
Notes:
-
The insertion should fail if there is already a key/value pair with the specified key. You should choose the BDB insertion method that will return a special value when the specified key already exists. Your code should handle this return value by throwing an exception with an appropriate error message. See our
CreateStatementcode for examples of throwing an exception. -
Review the
TableandInsertRowclasses as needed, as well as the Berkeley DBDatabaseclass.
Problem 5: Table iterators and unmarshalling
20 points
In order to execute a SELECT command, your DBMS needs to be able to
iterate over the rows in one or more tables, and to access the values
of the columns in those rows. In this problem, you will complete the
implementation of a table iterator that will be able to iterate over
all or some of the rows in a single table and access the values of the
columns. We can associate a WHERE clause with such an iterator, in
which case it will only visit rows that satisfy the WHERE clause.
Each table iterator will be an instance of the provided TableIterator
class. We have already implemented most of the methods of this class
for you, including:
-
a
TableIteratorconstructor that takes an already opened table object and initializes the state needed by the table iterator, including:- a cursor for the underlying BDB database
- two initially empty
DatabaseEntryobjects calledkeyandvalue. TheseDatabaseEntryobjects will be used by the cursor methods to retrieve the current key/value pair.
The constructor also examines the columns mentioned in the SQL statement for which this iterator is needed, and it associates this iterator with those columns; doing so allows the code that evaluated the
WHEREclause to use the iterator to obtain the column values that it needs. - afirst()method that positions the iterator on the first tuple of the table. - anext()method that advances the iterator to the next tuple specified by theSELECTcommand. - agetColumn()method that takes an indexnand returns aColumnobject for thenth column in the table associated with the iterator. The leftmost column has an index of 0. - aclose()method that closes the cursor associated with the iterator. - aprintAll()method that will be called to iterate over all rows in the associated table and print them out.
For this assignment, you should implement the method called getColumnVal()
that takes an index n and returns the value of the nth column in
the tuple on which the iterator is currently positioned. To do so, it
will need to unmarshall the appropriate value from the BDB key/value
pair associated with that tuple, and it should use the metadata that
you included when you marshalled the tuple to efficiently access the
value of the specified column. See the notes below for more detail.
Notes:
-
We have already given you the code needed to handle the two types of exceptions that are mentioned in the comments before the method.
-
You code that you write should assume that the underlying cursor has already been positioned on an appropriate key/value pair. The key can be accessed using the
DatabaseEntryobject to which theTableIterator‘skeyfield refers, and the value can be accessed using theDatabaseEntryobject to which theTableIterator‘svaluefield refers. -
Your code will need to use one or two
RowInputobjects to unmarshall the value of the specified column.For example, to create a
RowInputobject that is based on the value portion of the current key/value pair, you would do something like the following:RowInput valIn = new RowInput(this.value.getData());
-
Your
getColumnVal()method should not perform unnecessary reads. Rather, it should only read (1) the offset or offsets needed to determine where the column value is located and (when necessary) the length of the column value, and (2) the column value itself. -
The
RowInputclass includes two methods for each type of value:- one that reads a value at a specified offset from the start
of the byte array (e.g.,
readIntAtOffset()andreadDoubleAtOffset()). These methods jump to the specified position in the underlying byte array before performing the read. - one that reads a value at the current offset from the start
of the byte array (e.g.,
readNextInt()andreadNextDouble()). When theRowInputobject is created, the current offset is set to 0. After each read, the current offset is updated to be the offset of the byte that comes immediately after the value that was just read.
- one that reads a value at a specified offset from the start
of the byte array (e.g.,
-
The
RowInputclass also includes atoString()method that you may find useful when debugging. It returns a string that includes the contents of the underlying byte array and the current offset within that array. -
Review the
Table,Column, andRowInputclasses as needed, as well as the Berkeley DBDatabaseEntryclass.
Problem 6: SELECT * for a single table
10 points
Implement the execute() method of the SelectStatement class, and
any necessary helper methods. For this assignment, you will only
need to support SELECT * commands involving a single table.
Your method will need to open the table associated with the SELECT
command by using the open() method that we have provided for
Table objects. (See the start of the execute() method for
InsertStatement for an example of this.) The open() method will
get the table’s catalog metadata and add it to the Table object,
and it will also open the underlying BDB database if it isn’t
already open.
Your code should then create a TableIterator for the appropriate
table (assigning it to the variable iter that we have given you) and
invoke the printAll() method on it. This method, which we have
provided in TableIterator, will invoke the appropriate iterator
methods to obtain the table’s column values and display them with
appropriate formatting. Note that your SELECT-statement code does
not need to advance the iterator by calling next();
printAll() already does all of the iteration – and all of the other
work – for you, using the TableIterator method that you wrote.
Your execute() method should check for currently unsupported
SELECT commands:
- those with more than one table in the
FROMclause - those with one or more columns specified in the
SELECTclause.
In addition, it should make sure that there is an existing table with
the given name; the open() method of the Table object should make
it easy to do so.
If there is an error, you should throw an exception with an appropriate error message. If there are no errors, your method should finish by printing a message that includes the number of tuples selected.
Notes:
-
When creating the
TableIterator, make sure that you use the local variableiterthat we have declared for you at the top of the method. Doing so will allow you to take advantage of the code that we have given you at the end of the method, which closes the iterator, and thus its underlying cursor. -
The
TableIteratorconstructor takes a reference to an object of typeSQLStatement. You should pass in a reference to theSelectStatementobject on which theexecutemethod was invoked, which you can do by using the implicit parameterthis. In addition, you should pass intruefor the third parameter of the constructor:iter = new TableIterator(this, ..., true);
-
When you call the
printAll()method, you should pass inSystem.outas the parameter, so that the results will be displayed on the console. (The reason that we makeprintAll()take a parameter for this is for added flexibility. If we wanted to, we could pass in a parameter that corresponds to a text file, and the results would be written to that file instead of to the console.) -
Review the
Table,TableIterator, andSQLStatementclasses as needed.
Sample interaction
To give you a sense of what your DBMS’s output should look like, we have
provided a sample interaction below. Note: We set the DEBUG constant
to false in DBMS.java before we ran these commands.
Enter command (q to quit): CREATE TABLE Course(name VARCHAR(20), enrollment INT);
Created table Course.

Enter command (q to quit): SELECT * FROM Course;
 | name                 | enrollment |
---------------------------------------

Selected 0 tuples.

Enter command (q to quit): DROP TABLE Course;
Dropped table Course.

Enter command (q to quit): SELECT * FROM Course;
Course: no such table

Enter command (q to quit): CREATE TABLE Course(id CHAR(5) PRIMARY KEY, name VARCHAR(20));
Created table Course.

Enter command (q to quit): INSERT INTO Course VALUES ('01000', 'CS 460');
Added 1 row to Course.

Enter command (q to quit): INSERT INTO Course VALUES ('00050', 'Math 123');
Added 1 row to Course.

Enter command (q to quit): INSERT INTO Course VALUES ('02050', NULL);
Added 1 row to Course.

Enter command (q to quit): INSERT INTO Course VALUES ('00050', 'Physics 211');
There is an existing row with the specified primary key.
Could not insert row.

Enter command (q to quit): SELECT * FROM Course;
 | id    | name                 |
----------------------------------
 | 00050 | Math 123             |
 | 01000 | CS 460               |
 | 02050 | null                 |

Selected 3 tuples.

Enter command (q to quit): q
Submitting your work for Part II
Login to Gradescope by clicking the link in the left-hand navigation bar, and click on the box for CSCI E-66.
You should submit only the following four files:
InsertRow.javaInsertStatement.javaTableIterator.javaSelectStatement.java
Here are the steps:
-
Click on PS 2: Part II in the list of assignments. You should see a pop-up window with a box labeled DRAG & DROP. (If you don’t see it, click the Submit or Resubmit button at the bottom of the page.)
-
Add your files to the box labeled DRAG & DROP. You can either drag and drop the files from their folder into the box, or you can click on the box itself and browse for the files.
-
Click the Upload button.
-
You should see a box saying that your submission was successful. Click the
(x)button to close that box. -
The Autograder will perform some tests on your files. Once it is done, check the results to ensure that the tests were passed. If one or more of the tests did not pass, the name of that test will be in red, and there should be a message describing the failure. Based on those messages, make any necessary changes. Feel free to ask a staff member for help.
-
If needed, use the Resubmit button at the bottom of the page to resubmit your work. Important: Every time that you make a submission, you should submit all of the files for that Gradescope assignment, even if some of them have not changed since your last submission.
-
Near the top of the page, click on the box labeled Code. Then click on the name of each file to view its contents. Check to make sure that the files contain the code that you want us to grade.
Important
-
It is your responsibility to ensure that the correct version of a file is on Gradescope before the final deadline. We will not accept any file after the submission window for a given assignment has closed, so please check your submission carefully using the steps outlined above.
-
If you are unable to access Gradescope and there is enough time to do so, wait an hour or two and then try again. If you are unable to submit and it is close to the deadline, email your homework before the deadline to
esaracin@bu.edu
Last updated on October 13, 2024.